Problems in XP, Vista and Windows 7
01. Missing Taskbar icons
Version: XP, Vista, 7
If icons have disappeared from the Taskbar's notification area, there are two things to try: first, press the Windows key and [R], type "regedit" and press [Enter].
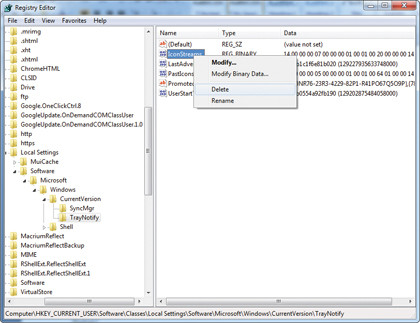
Browse to HKEY_CURRENT_USER\ Software\Classes\Local Settings\Software\Microsoft\Windows\ CurrentVersion\TrayNotify, and delete both IconStreams and PastIconsStream values.
Reboot, or log off and back on again. If the problem persists in XP, and you can live without it, open the Add or Remove Programs Control Panel, click Add/Remove Windows Components, expand Networking Services, and untick "UPnP User Interface". Then click OK > Next.
02. PC won't sleep
Version: XP, Vista, 7
If your PC won't stay asleep it's often because a device is configured to bring it out of standby when triggered. Identify the culprit by pressing the Windows key and [R], type "cmd" and press [Enter].
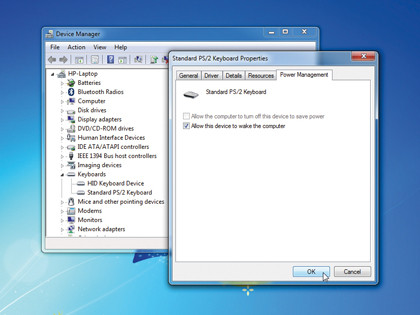
Type the following line and press [Enter]: powercfg –devicequery wake_armed
Now press the Windows key and [R] again, but this time type "devmgmt.msc" to open Device Manager. Find any devices listed earlier, then double-click them and look for an Advanced or Power Management tab.
Check if the device is allowed to bring the PC out of standby – if it is, untick all the boxes that wake it. Click OK, close Device Manager and test it worked; repeat the process if necessary.
03. Quick fixes
Version: XP, Vista, 7
Microsoft has developed the Fix It Center tool, which includes all of the automated fixes for various Windows problems it has released over the last few years. Download and install it from http:// fixitcenter.support.microsoft.com, then launch the tool from its desktop shortcut.
A list of available troubleshooters for your version of Windows will be listed; if one describes the problem you're having then click the Run button next to it and see if it can resolve your problem.
04. Remove printer drivers
Version: XP, Vista
To ensure all traces of an old printer are removed from your PC, open Printers or Printers and Faxes. Right-click blank space in the Printers Control Panel and choose Server Properties (in XP) or Run as Administrator > Server Properties > Continue (in Vista).
Switch to the Driver tab – if your driver is still present, select it and click Remove. If you're using Vista you should leave "Remove driver only" selected only if the drivers were provided by Windows. Click OK followed by Yes > Close.
05. Verify system files
Version: XP, Vista, 7
The System File Checker (SFC) tool enables you to scan for – and replace – corrupt and missing fi les. If you use XP you can use it to scan your entire drive, while in Vista and Windows 7 it can verify individual fi les and folders too. If you have an installation CD, keep it handy in case it's needed.
Step 1. In Windows XP

Click Start > Run, type "sfc /scannow" and press [Enter] to check your entire drive for errors. Have your installation CD handy in case you're asked for it.
Step 2. Vista and Windows 7
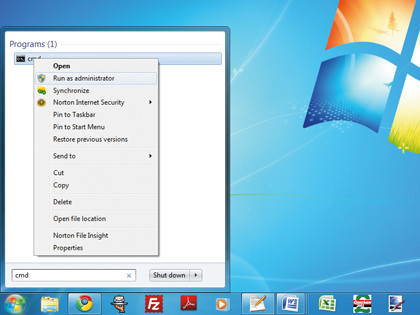
Click Start, type "cmd", then right-click cmd.exe and choose Run as Administrator > Continue. Type "sfc /scannow" and press [Enter] to check your entire drive.
Step 3. Scan and replace
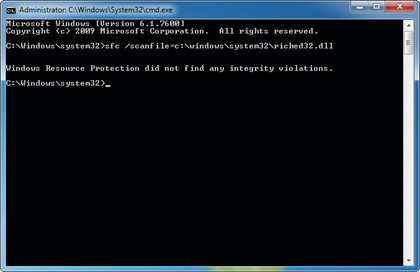
Alternatively, type "sfc /SCANFILE=path \fi lename" and press [Enter], replacing path\fi lename with your chosen fi le – such as c:\windows\system32\riched32.dll.
06. Program compatibility problems
Version: XP, Vista, 7
If you have issues with a program check its website or Google the program's name, version number and your version of Windows to see if there are any issues with it.

Avoid installing system software not listed as compatible with your version of Windows, otherwise try installing it as normal; if it fails, Windows 7 may offer to apply compatibility settings to it – see if these work.
If the program installs but won't run, right-click its program shortcut and choose Properties > Compatibility Settings. Select your old version of Windows from the list and click OK.
If this fails, try ticking "Run this program as an administrator"; in Windows 7 you can also click "Help me choose the settings" to gain access to the Program Compatibility Troubleshooter.
07. PC keeps rebooting after Windows Update
Version: XP, Vista, 7
If your PC gets stuck in a cycle of rebooting during the update process, you need to undo the updates using System Restore. If your computer came without a Windows disc, look for an option to access recovery options, or tap [F8] before Windows starts loading, and then choose "Repair your computer".
If you have an installation disc, boot from it, select your language and then choose "Repair your computer". In both cases, when the menu appears, choose System Restore to undo the update.
08. System Restore not working
Version: XP, Vista, 7
If you're having problems restoring your computer to an earlier state, try booting into Safe Mode (tap [F8] as your PC restarts) and running System Restore from there.
In Vista and Windows 7 there's also another option: you can also run the tool directly from your Windows disc (see tip seven, above) if you can't access Windows.
09. Windows Media Player missing songs
Version: XP, Vista, 7
Tracks missing from Windows Media Player? Try clicking Start > All Programs > Accessories. If you're using XP you should select the Command Prompt, or in Vista or Windows 7 right-click it and choose Run as Administrator.
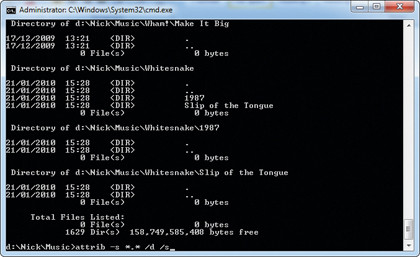
Switch to the folder containing your music using the cd command (for example, cd music cd my documents\my music), then type "attrib -s *.* /d /s" and press [Enter].
Once complete, open Media Player and press [F3], or choose Tools > Advanced > Restore Media Library (in Windows 7) to access all your music again.
10. Action Center
Version: 7
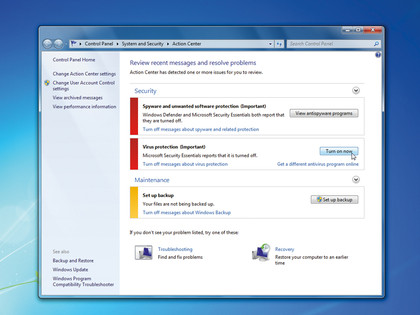
Click the flag icon in the Taskbar's notification area to access the Action Center. Here you can get an at-a-glance look at problems, plus launch a series of troubleshooters to help quickly fix the problems that plague you, without getting your hands dirty.