Problems in XP, Vista and Windows 7
21. Create a repair disc
Version: 7
If your PC didn't come with a Windows installation disc, click Start, type "backup" and click Backup and Restore.
Select "Create a system repair disc" and put a blank CD or DVD in your writeable drive to create a bootable disc with the "Repair your computer" options on it.
22. Where's GPEDIT?
Version: XP, Vista
If you're running one of the Home editions of Windows, you'll find the gpedit.msc tool is missing. If you're instructed to fix a problem using this tool and you're running Windows XP, visit here to find the equivalent setting in the Registry.
Alternatively, for the Home edition of Vista you can download an Excel spreadsheet with the various settings from here.
23. System Restore problems
Version: XP, Vista, 7
Restore points are cumulative in reverse – each new one only saves what's changed – so old points rely on newer ones to work; if one corrupts then all older ones are lost. That means the older a Restore point, the less reliable it is, so avoid using anything but the most recent one.
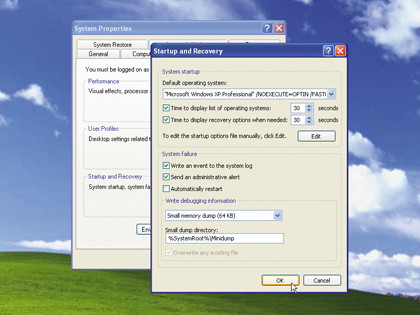
Open Disk Cleanup (Start > All Programs > Accessories > System tools) and – if prompted – choose "all users". On the More Options tab delete all but the newest Restore point. If all else fails, disable System Restore and lose all Restore points, then re-enable it.
For XP use the tool here; in Vista and Windows 7 open System Protection, untick all the boxes and click Turn off System Restore > Apply. Tick your system drive again and click Apply to switch it back on.
If you're plagued with specific error messages, or System Restore doesn't work well, you'll find useful solutions here.
24. Text too small
Version: XP, Vista, 7
If you're struggling to read the text on your screen simply right-click the desktop and choose "Personalization" or "Properties". In Windows 7 click Display, or in Vista select "Adjust font size (DPI)"; in XP switch to the Settings tab and click Advanced.
Select a larger size to suit you and click OK twice followed by Yes > Close, rebooting if prompted. Certain programs will throw up warnings – in Vista and Windows 7 you can right-click the program shortcut and choose Properties > Compatibility tab, then tick "Disable display scaling on high DPI settings".
25. Video display problems
Version: XP, Vista, 7
When playing back video on your PC, does the screen appear too light or dark, or is the colour balance all wrong? That's because the video uses special "overlay" settings in place of Windows' own.
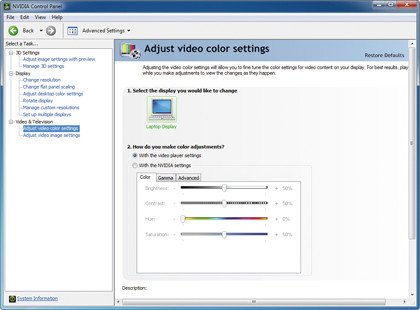
To resolve this, right-click the desktop and look for an Nvidia or ATI option; if it's not there, choose "Personalization" or "Properties" instead. Choose Settings or Display Settings and look on the tabs for a video or advanced option.
Once located, make sure the video settings are set to that of the player, and not your graphics adaptor. When this is done, save your settings to resolve the problem.
26. Use Event Viewer
Version: Vista, 7
Windows records all major events, including errors and warnings, which can be accessed for troubleshooting. Press the Windows key and [R], type "eventvwr.msc" and press [Enter]. Now expand Windows Logs and click on a log.
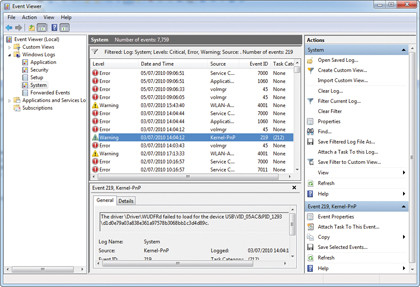
Click Filter Current Log, tick Critical, Error and Warning and click OK. Click an event that occurred around the time of your problem: each event will provide more information about your problem – if there's a link to more help online, select it.
Some events won't produce any extra information, but many will; you may even get possible solutions to try, but if not, make a note of any extra detail to use in a Google search.
27. Fix Reliability Monitor not working
Version: Vista
If Reliability Monitor stops updating, open Event Viewer (see tip 26), expand Windows Logs, right-click System and choose Clear Log > Clear.
Launch Task Scheduler from the Start menu's Search box, select View > Show Hidden Tasks, then expand Task Scheduler Library > Microsoft > Windows > RAC.
With RAC selected, right-click RACAgent in the middle pane and select Run. Its status should then change to Running, indicating that the Reliability Monitor is working correctly once again.
28. Event Viewer and XP
Version: XP
Open Event Viewer as outlined in tip 26, then select a log from the left-hand list (System or Application are the best to try) and choose View > Filter.
Untick Information, then click OK to leave all warnings and errors listed. Now review the logs and see what's happening behind the scenes.
29. Change Safe Mode resolution
Version: XP, Vista, 7
A lot of troubleshooting tasks are performed in Safe Mode, and you'll probably find that the default resolution (800 x 600) can be a little cramped to work in.
Thankfully you can force Windows to always display Safe Mode in a higher resolution with a simple tweak.
Step 1. Boot into Safe Mode
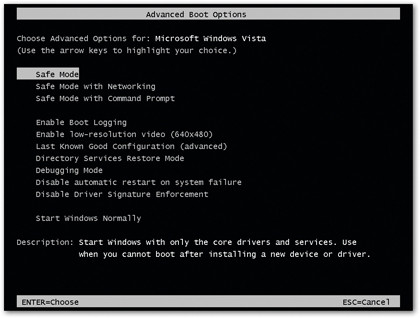
Restart your PC and tap [F8]. When prompted, choose Safe Mode, then log into your user account when prompted. Don't select System Restore if prompted.
Step 2. Access Display Settings
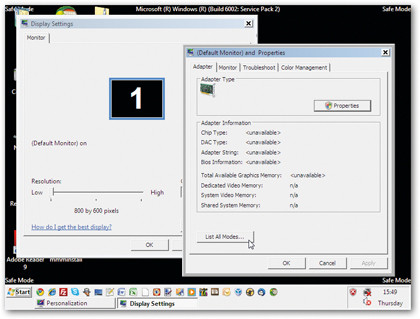
Right-click the desktop and choose Properties (XP) or Personalize (Vista and Windows 7). Select Display Settings, then Advanced > Adapter tab > List All Modes.
3. Try new resolution
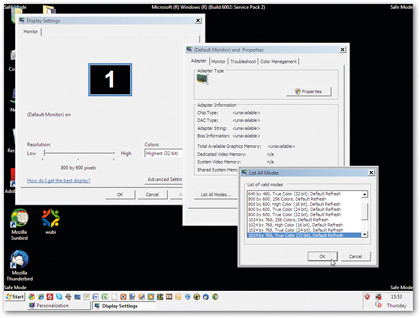
Select a higher resolution from the list and click OK > Apply. If the screen is readable click OK; click "List All Modes" again to select another option..
30. Delete wireless network
Version: XP, Vista, 7
If you need to delete existing settings for your Wi-Fi network, what do you do?
In Vista and Windows 7 you should open the Network and Sharing Center and click "Manage wireless networks", then select an entry and click Remove.
If you're running XP and using Windows to manage your wireless networks click "Change the order of preferred networks" to remove unwanted networks.